Your Cart is Empty


4 Ways to Secure a Buckle

Every sewing project has a few no fail zones.
Whether you're building a backpack, fanny pack, dog leash, or bike bag, there are usually three or four attachment points that support the load of the bag. If one of those points fails, it doesn't matter how clean the rest of your stitching looks. The project has failed.
That's especially true when attaching buckles. These connection points experience repeated pulling, twisting, and stress every time the gear is used.
Fortunately, you don't need industrial equipment to create a strong attachment. With the right stitch pattern and a little practice, you can dramatically increase the strength of your project using a standard sewing machine.
Here are four proven ways to secure a buckle, from the quickest option to professional grade reinforcement.

1. The Repeated Straight Stitch
The repeated straight stitch is the simplest method and a great starting point for beginners.
Instead of sewing one pass across the webbing, simply stitch back and forth (3-4 times maximum) over the same line three or four times. Each pass adds additional thread, increasing the holding strength while requiring no special stitch settings.
We recommend only doing 3-4 passes at a max because more stitches also mean more holes in the material which could result in a weaker stitch over all.
Pros
• Fast and easy
• Works on virtually every sewing machine
• Great for light duty projects
Cons
• Concentrates the load into a single line of stitching
• Less secure than the other methods
• Doesn't distribute force across the webbing
If you're building organizers, accessory pouches, or projects that won't experience heavy loads, this method is often more than sufficient. For backpacks or high stress applications, however, there are stronger options.

2. The DIY Bartack
If you've ever looked closely at climbing gear, backpacks, or commercial outdoor equipment, you've probably noticed the bartacks.
They're one of the strongest reinforcement stitches available and are specifically designed for areas that experience repeated pulling.
While true bartacks require specialized industrial machines, many home sewing machines can produce a similar result using a zigzag stitch or buttonhole setting. With a few adjustments to stitch width and stitch length, you can create a reinforcement that closely mimics a factory bartack.
Pros
• Extremely strong
• Professional appearance
• Excellent for high load attachment points
Cons
• Requires experimentation
• Thick webbing can challenge lighter machines
• Stitch settings vary from machine to machine
Before sewing your final project, test your settings on scrap material. Multiple layers of webbing can quickly reveal whether your machine has enough punching power for the job.

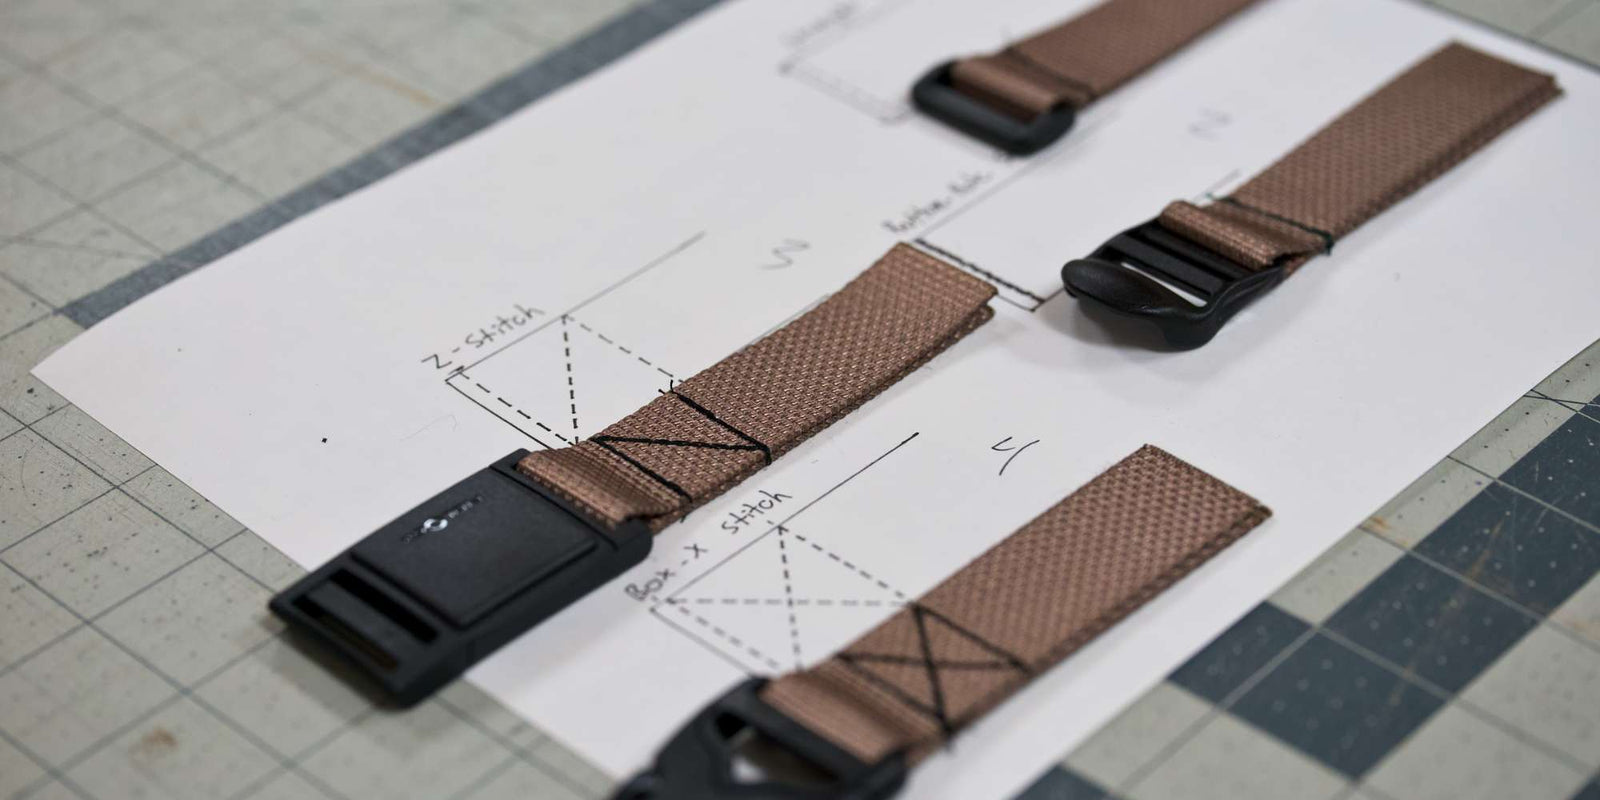
3. The Z Stitch
The Z stitch offers an excellent balance of strength, simplicity, and appearance.
Instead of concentrating all of the force in one location, the zigzag pattern spreads the load across a larger section of webbing. This helps reduce stress concentrations while creating an attractive finished look.
One of the biggest advantages is that it doesn't require any specialty equipment or complicated machine settings.
The silver lining to a Z stitch is that you can distribute load really effectively with one single stitch sequence. This is a popular technique used on budget bags and gear.
Pros
• When done well it looks great
• Better load distribution
• Easy to sew on a standard machine
Cons
• Slightly more time consuming than a straight stitch
• Requires balance stitching to look clean
This stitch works particularly well on fanny pack wings, shoulder straps, and other medium to high stress attachment points.

4. The Box X Stitch
If you've ever inspected climbing slings, backpacks, or military gear, you've probably seen the Box X.
There's a reason.
The combination of a perimeter box and diagonal X spreads force in multiple directions, creating one of the strongest attachment methods you can sew on a conventional machine.
It also reinforces a larger area of the webbing, helping prevent localized wear over time.
Pros
• Extremely strong
• Excellent load distribution
• Ideal for high wear areas
Cons
• Takes the longest to sew
• Requires careful alignment for a clean finish
Whenever you're attaching shoulder straps, pack wings, handles, or other heavily loaded components, the Box X is an outstanding choice.
You may notice this is very similar to the Z stitch. And you'd be right. It's nearly identical. With the added diagonal line the only trade off is more time for more security.
Common Mistakes to Avoid
Even the strongest stitch pattern can fail if it's sewn incorrectly.
A few mistakes to watch for:
• Stitching beyond the edge of the webbing and into the surrounding fabric
• Concentrating all of your stitches in one small area
• Using stitch lengths that are too small or too large for the application
• Forgetting to backstitch at the beginning and end when appropriate
Taking a few extra seconds during setup can make the difference between a buckle that lasts for years and one that pulls free on its first trip.
Always start a construction with a plan for precisely what the entire stitch sequence will look like. Your margin for error is markedly lower if you know exactly what you want to do before the needle starts whirling.

Pro Tip: Always Test on Scrap
Different combinations of webbing, fabric, thread, and needle behave differently.
Before stitching on to your project, sew a few test samples using the same materials and layers you'll be sewing later. Adjust your stitch length, tension, and stitch pattern until you're happy with both the appearance and the strength.
A five minute test can save hours of frustration and an otherwise finished project.
Which Stitch Should You Choose?
There's no single "best" stitch for every project.
• Repeated Straight Stitch: Quick repairs and light duty projects.
• DIY Bartack: High load areas when your machine can handle the thickness.
• Z Stitch: A great all around choice for packs and straps.
• Box X Stitch: Maximum strength for critical attachment points.
The best stitch is the one that matches your project's demands while working within the capabilities of your sewing machine.
Final Thoughts
Your buckle attachment is one of the most critical parts of your build. Spending a little extra time choosing the right stitch pattern can dramatically improve the strength, longevity, and reliability of your project.
When in doubt, test your stitch, pull on it aggressively, and let the results guide your final choice.
Your future self and your gear will thank you.
Leave a comment
Comments will be approved before showing up.