Your Cart is Empty
This blog was written in conjunction with Ep. 67 from our podcast, Ripstop on the Record.
If you want to listen, click here.
If you want to watch, click here.
Shoulder straps are the most defining feature of a pack. Many people will shop for a new pack purely based on the shoulder strap design. This design will alter the comfort and the fit more than anything else. Due to the personal nature of shoulder straps, t’s hard to find the perfect strap. Insert DIY potential…
In this blog, we’re going to talk about the different ways that you can design and make your own shoulder straps. Designed for you, your body, your pack, your style, and your desires.
To make this digestible, we’re going to break the strap making process into 7 different sections. Each section we’ll give you the pros and cons of each option. Finishing with what we’d recommend a beginner should try out first.
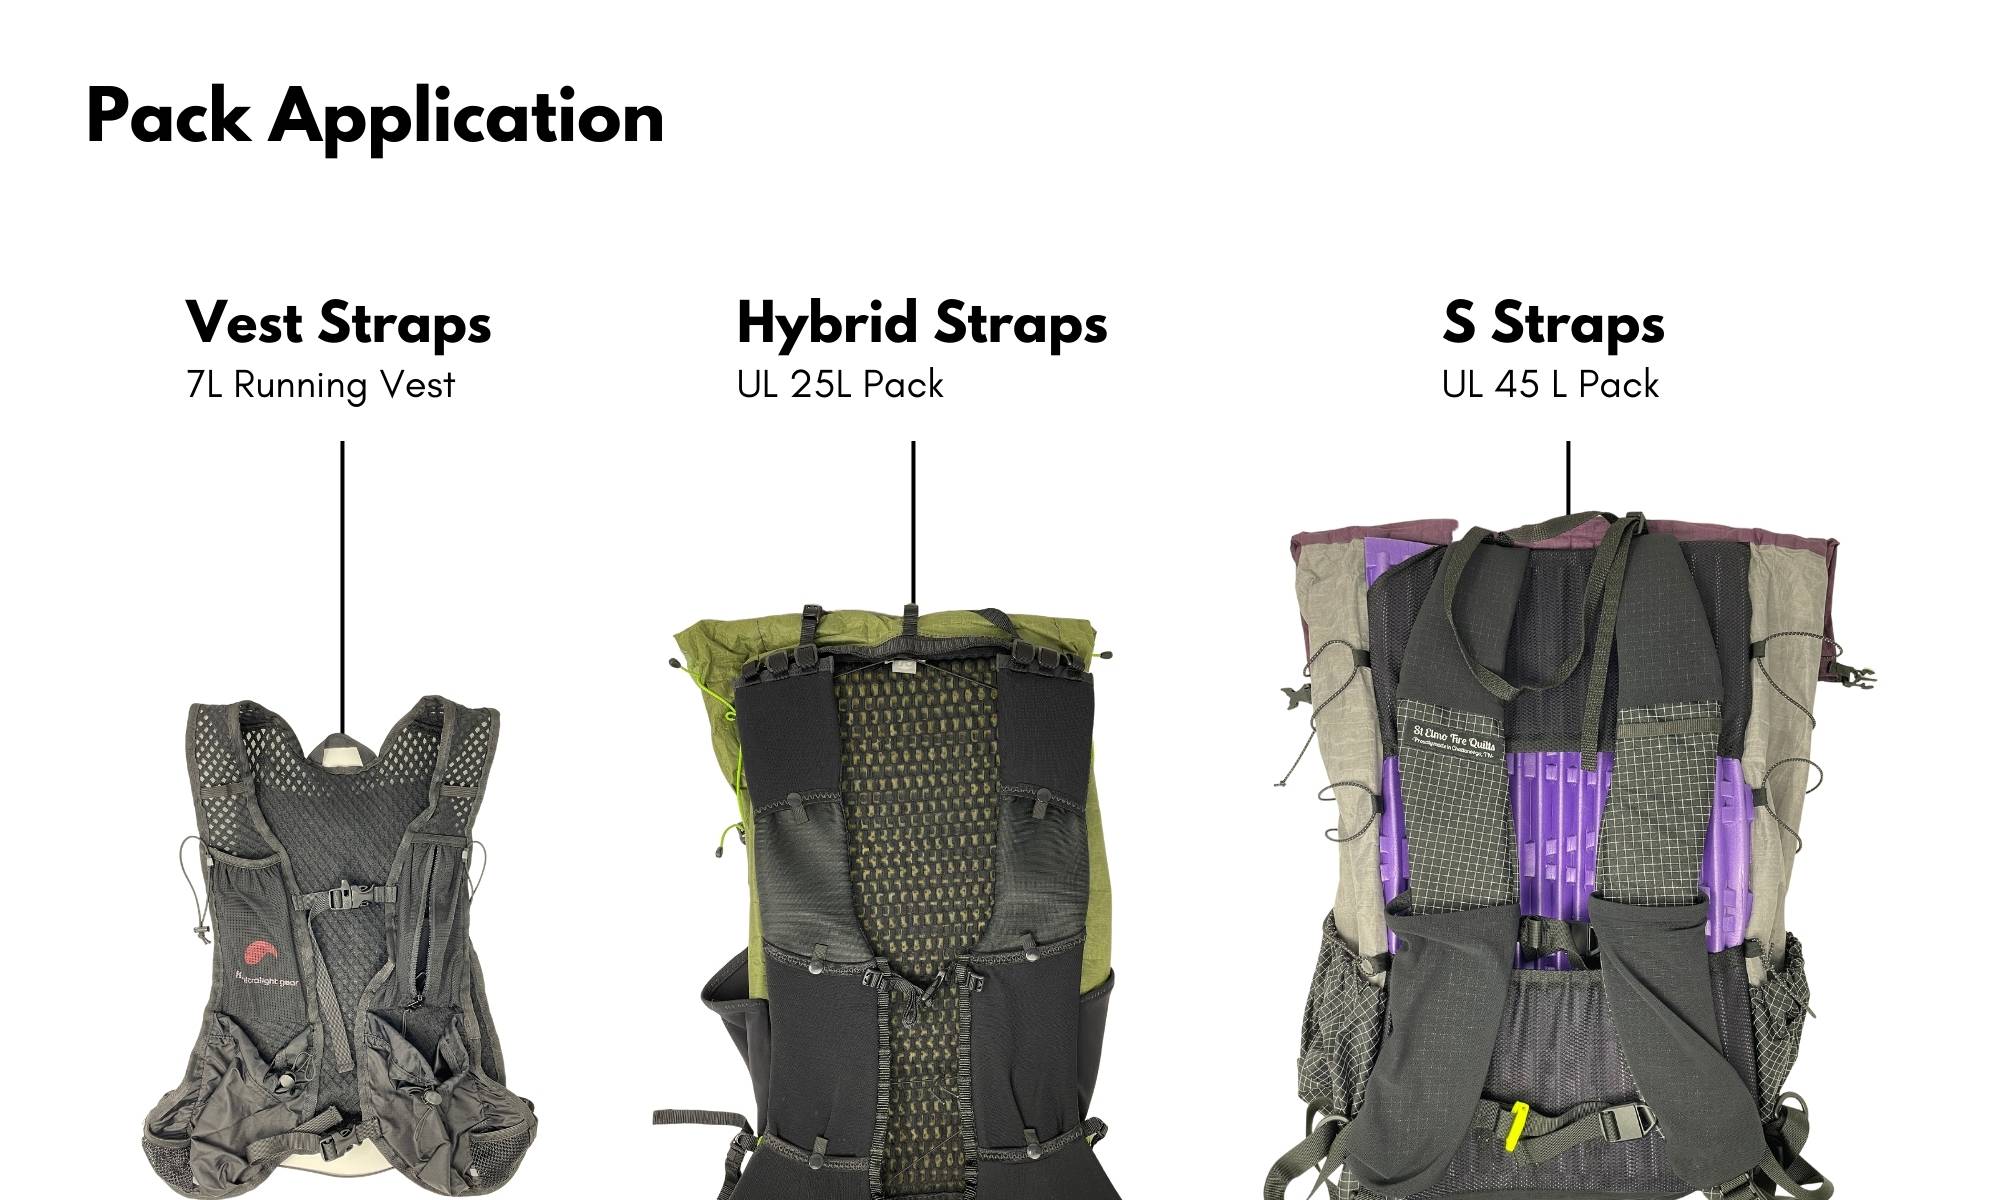
Before you can decide which straps you want to make and how to make them, you first need to define what it is you want to accomplish. There are five things to consider within pack application.
1a. Pack Style
The style of pack will inform some of the choices you have with the straps. For example, if you want a vest style day pack, then you can't use J straps. Think about what kind of pack you're making, what the weight capacity will be, and how you want it to ride.
2a. Body Type
Each of our bodies have different angles and curves, (or flats if you will) which make strap fitting difficult. Certain straps are designed with body types in mind.
For examples, a slim and fairly shapeless strap won't be very comfortable for someone that has a lot of shape over their upper body.
The best way to find out which strap is comfortable t is to go to your local gear shop and try some different styles on.
4a. Frame Type
This sub-section will be dependent on what type of pack you choose. With any pack that will be holding more than 20 pounds, we recommend adding some frame structure to your pack. Even if it's an external sit pad or a plastic frame sheet, anything helps.
Straps that are made with a frame structure often provide more support.
5a. Load Lifters
If you're looking for a pack that will need to hold some serious weight, then you may consider adding load lifters to your straps.
This is definitely not a beginner step but it is a really nice addition for a pack that will see long hauls with heavy loads.
Earlier we said that straps are the most defining feature of the pack. To get more specific on that, it’s really the strap style that is so defining. When you know about the style, then you’ll be able to better understand the evergreen debate on straps and also know which one fits you the best.
J Strap
Shape: Straight over the shoulder, mostly straight over the chest, with a curve going outward over the ribs toward the hip.
Pros: Simple to make
Cons: Can be too shapeless to be comfortable, potential for neck abrasion, high wear spots.
Examples:
- Hyperlite Mountain Gear 3400 Southwest
S Strap
Shape: Outward curve over the shoulder to avoid the neck, curves inward over the chest, then curves back out over the ribs toward the hip.
Pros: Great for breasts or larger chests, often avoids any neck irritation, distributes load well
Cons: Hard to make, hard to find the right one
Examples:
Vest Straps
Shape: Straight over the shoulder, gets wide over the chest and cuts under the arm, over the ribs.
Pros: Great pocket storage, locks in very well, distributes load well, reduces bounce, wears close to body
Cons: Hard to make, wears close to the body, a lot more friction points, no adjustability
Examples:
Hybrid Straps
Shape: There is no standardization for a hybrid strap. It fully depends on the designer.
Pro: You can marry the best features of previously mentioned styles.
Con: You may end up with new cons that are unforeseen.
Examples:
The style of the strap is noticeable from the eye. But how the strap looks is marginally important compared to how comfortable it is. And comfort has a heavy basis on the material.
Face Materials
The face material is the primary fabric that you use to make the strap. A durable woven laminate with some stretch is a great choice for the face material.
Examples:
Backing Material
The backing material needs to provide cushioning. Choosing a fabric that is breathable, comfortable, and soft is imperative.
Examples:
Cushioning Material
This is not required for some straps. If you are making a pack that could see loads in excess of 20 pounds or more, you may consider adding a cushioning material. We recommend using a 4mm-8mm closed cell foam.
Accessory Material
We all know that a large part of MYOG is making gear that LOOKS just so. Accessory materials are used to make sure the strap matches your pack and your esthetic.
Components + Narrow Goods
The options for components and narrow goods are as vast as the day is long. However there are a few things you need to check off your list.
- Strap Adjuster
- Webbing for adjuster
- Binding (grosgrain)
This is just my opinion, but I really think that sternum straps can make a DIY pack look really professional. I think it’s because this is where you can dig into the massive array of components that are out there. Components can be used for two things though. First you gotta figure out how it attaches to the pack and second how the sternum strap will adjust
How it attaches to your pack
You have two options when it comes to attaching your sternum strap. You can either sew the sternum strap directly onto the strap so it is in one place forever. Or you can build in an adjustable system so you can alter the fit of the sternum strap.
Popular Adjustable Systems:
- Piping
- Daisy chains
- Webbing Loops
How it Adjusts
Next you need to think about you want the sternum strap to adjust when it's sitting over your chest. You'll need to ask yourself questions like, "Do I want cord or webbing? Do I want a buckle or a hook? Do I want multiple straps? Do I want some elasticity in the system?"
Popular Adjustment Systems:
Your strap isn’t independent of your pack. Everyone knows this. But you may not know the options you have when attaching the strap to the pack.
Once again, you can either make the strap attach indefinitely by sewing it to the pack or you can make a removable system.
At the Shoulder
Permanent Attachment Options:
- Sewn-In: You sew the shoulder strap
directly into a seam at the top of the shoulder of the pack.
- Sewn-on: You sew the shoulder strap to the back panel and then cover it up with a patch after.
Removable Attachment Options:
- D-Ring
- Daisy Chain
- Buckle
At the Hip
- Sewn-in: Attach the strap with a fabric wing. This secures and redirects the webbing for a more comfortable direction of pull.
- Removable: Use an independent webbing loop or a components on a loop to remove the strap at the hip.
Accessories are maybe the sexiest part of the strap building process. The accessories to the strap can change how you carry your pack. Don't worry, the options are endless.
Accessory Options:
- Removable Pockets
- Rib, Chest, Shoulder
- For phone, water, snacks, gloves, etc.
- Attached Pockets
- Rib, Chest, Shoulder
- For phone, water, snacks, gloves, etc.
- Media Loop
- For camera mount
- Daisy Chain
- For removable pockets and pouches
- Adjusters
- For different accessories
- Umbrella Holster
We're onto the final step, putting the straps together. There are two ways you can construct a shoulder strap and we'll break them down for you here.
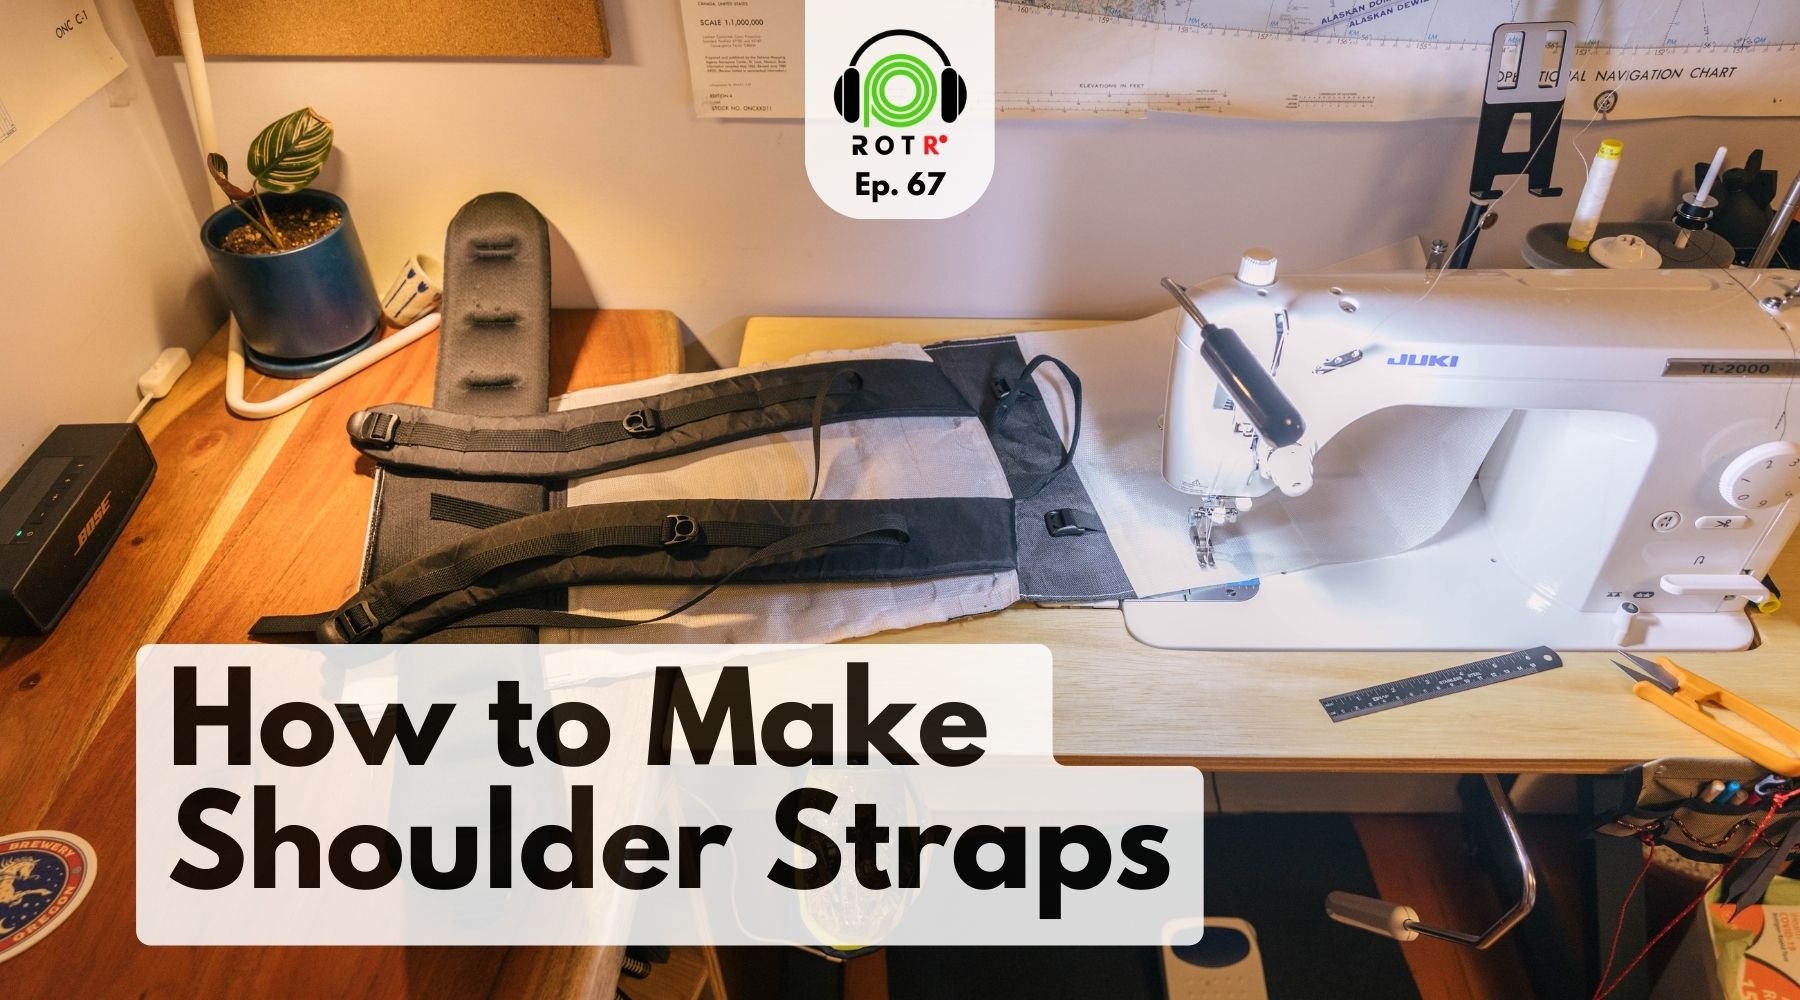
Method 1: Baste + Bind
Placing the strap fabrics right-side out (or the wrong side to wrong side), you will run a basting stitch around the perimeter leaving the top of the strap open. After you finish the seam you will bind around the entire strap with grosgrain ensuring that everything stays together and also covering all raw edges.
Method 2: Inside Out
Placing the strap fabrics inside out (or face to face), you will run a basting stitch around the perimeter leaving the top of the strap open. After you finish the seam you will flip the strap inside out and insert your cushioning material, and stitch that in place, holding everything together.
Both of these methods are totally valid and will work fine. Dozens of companies have used both of these techniques to create their straps.
For a new maker, we'd recommend a simple project.
1. Pack Application
Make something fairly small that won't see too much weight. Think in the 25L or less range like a city day pack that can be comfortable for the majority of people that also doesn't use a frame, and doesn't use load lifters.
2. Strap Types
For the sake of practicing and getting used to making straps, we'd suggest that you try J straps.
3. Materials & Components
Face Material:
210D Robic
Backing Material:
1/4" Spacer Mesh
Cushioning Material:
*Optional* 4MM Closed cell foam
Accessory Material:
*Optional* Contrasting color of 210D Robic.
Components/Narrow Goods:
- 1" Mil-Spec Webbing
- 1" grosgrain
4. Sternum Strap
How it attaches to your pack:
Daisy Chain down the length of the strap.
Adjusting: via daisy chain
How it adjusts:
Use the ul bunny sternum clip
5. Attaching the straps to your pack
The easiest way to attach your straps is to sew them onto the back panel. Then create a patch that goes over the raw edges of the strap and the bar tacks.
6. Accessories
Hold off on these for now. We added the daisy chain so it was easy to make them later on.
7. Construction
Try the inside out method first.
Comments will be approved before showing up.